How to Draw an Axolotl: Complete Guide for Beginners and Artists
Hey there! I’m excited to share everything I’ve learned about drawing these adorable little water creatures over my 9 years working with and sketching axolotls. Whether you’re picking up a pencil for the first time or you’ve been doodling for years, I’ll walk you through the exact steps I use.

What Makes Axolotls Special to Draw
Before we grab our art supplies, let me tell you why axolotls are amazing subjects. These Mexican salamanders have this permanent smile that makes everyone happy. Their frilly gills look like tiny feathers, and those little legs? Absolutely perfect for practice.
I’ve drawn hundreds of these guys, and each one teaches me something new. The best part? They’re forgiving subjects. Small mistakes often make your drawing look even cuter.
Gathering Your Materials
You don’t need expensive supplies to start. Here’s what I keep on my desk:
Basic supplies:
- Regular pencil (HB or 2B works great)
- Eraser (I prefer the kneaded kind)
- Paper (printer paper is fine)
- Black pen or marker for outlining
Optional extras:
- Colored pencils or markers
- White gel pen for highlights
- Blending stump
- Reference photos
Step-by-Step Drawing Tutorial
Step 1: Start with Simple Shapes
Draw a horizontal oval for the body. Think of a fat cucumber lying on its side. This forms your foundation.
Add a smaller circle that overlaps the left side of your oval. This becomes the head. The connection between these shapes creates that classic axolotl silhouette.
Pro tip: Keep your lines light at first. You’ll thank yourself later when erasing.
Step 2: Adding the Head Features
Draw two small circles on top of the head for eyes. Space them apart – axolotls have wide-set eyes that give them that derpy, loveable look.
Inside each eye, add a smaller circle for the pupil. Leave a tiny white spot for the shine. This single detail brings life to your drawing.
Sketch a curved line for the mouth. Start it below one eye and curve it gently upward toward the other eye. That signature smile is what makes people fall in love with these creatures.
Step 3: The Distinctive Gills
This is where your axolotl gets its personality. On each side of the head, draw three wavy lines extending outward. These represent the external gills.
At the end of each line, add a feathery texture. Think of tiny branches or fringe. I usually draw small, short lines radiating from the main gill stalk.
The gills flow backward, like hair blowing in the wind. Don’t make them too stiff – organic, flowing lines look much better.
Step 4: Creating the Body Shape
Connect your head circle to the body oval with smooth, flowing lines. The neck area should curve gently – no sharp angles.
Extend the body into a tail. The tail starts wide where it meets the body and gradually tapers to a rounded point. It should be roughly the same length as the body.
Add a fin along the top and bottom of the tail. These fins are thin and wavy, like a ribbon.
Step 5: Drawing the Legs
Axolotls have four legs, and they’re surprisingly simple to draw.
Front legs: Draw two small legs near the head. Each leg looks like a tiny arm with four fingers. The fingers are stubby and rounded – almost like little sausages.
Back legs: Place these further back on the body. They’re slightly larger than the front legs. Give them four toes that point outward.
The legs should look a bit chubby. These aren’t athletic creatures – they’re round and soft.
Step 6: Adding Details and Texture
Now we refine. Add small dots along the body for texture. Axolotls have slightly bumpy skin, and these dots suggest that without making your drawing too busy.
Draw a small line from each eye to the nose area. This gives definition to the face.
Add tiny nostrils – just two small dots near the front of the head.
Thicken the gill branches slightly and add more feathery details if you want extra realism.
Step 7: Outlining and Cleaning Up
Go over your final lines with a darker pencil or pen. Work slowly and confidently.
Erase the construction lines and light sketches. Your axolotl should now have clean, defined edges.
Vary your line weight. Make the bottom of the body slightly thicker to give weight. Keep the gill details delicate and light.
Step 8: Coloring Your Axolotl
Axolotls come in amazing colors:
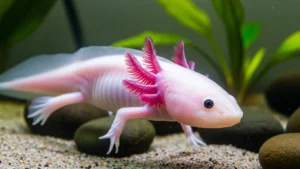
Wild type: Dark brown or black with gold flecks Leucistic: Pink body with darker pink gills (most popular) Golden albino: Yellow-gold with bright red-orange gills Melanoid: Solid black or dark gray Copper: Caramel brown with copper tones
I usually start with a base color, then add shadows underneath the body and legs. The gills often have a gradient – darker at the base, lighter at the tips.
Add white highlights on the top of the head, back, and legs. This makes your axolotl look wet and shiny.
Drawing Different Axolotl Poses
Front View
This perspective is trickier but rewarding. Start with a circle for the head. Place the eyes on either side, visible from the front.
The body extends straight back, getting narrower. You’ll see less of the tail from this angle.
The gills fan out on both sides like a crown. The front legs point toward you, showing all those tiny fingers.
Side Profile
This is the classic view I’ve shown you. It’s the easiest angle and shows off all their best features.
Swimming Pose
Draw the body in a gentle S-curve. The tail curves one way, the head turns slightly the other direction.
Position the legs in swimming motion – front legs reaching forward, back legs pushing behind.
Add movement lines or bubbles to suggest water.
Curled Up Pose
Start with a C-shape for the body. The head tucks toward the tail.
The legs curl inward. This is how axolotls rest sometimes, and it looks incredibly cozy.
Common Mistakes and How to Fix Them
Mistake 1: Pointy head Axolotls have round, soft heads. If yours looks too triangular or pointed, go back and round out those edges.
Mistake 2: Skinny body These are chunky animals. If your axolotl looks like a lizard, make the body wider and rounder.
Mistake 3: Too few gill branches Each main gill should have at least 4-6 little branches. Sparse gills look unfinished.
Mistake 4: Stiff legs Real axolotl legs bend and curve. Add a slight bend at the joints for a natural look.
Mistake 5: Forgetting the smile That upturned mouth is essential. Even a straight line works, but an upward curve is better.
Tips from Years of Practice
Study real axolotls: Watch videos or look at photos before you draw. Notice how they move, how the gills float, how the legs position themselves.
Start simple: Your first drawings won’t be perfect. That’s completely normal and expected. I’ve filled sketchbooks with wonky axolotls.
Draw daily: Even five minutes helps. Draw from memory, from photos, or copy other drawings.
Experiment with styles: Try cartoon versions, realistic sketches, or abstract interpretations. Each style teaches different skills.
Join communities: Share your work online. Other artists give helpful feedback and encouragement.
Keep references handy: I have a folder of axolotl photos on my phone. Different angles, different colors, different ages.
Practice the gills separately: They’re the hardest part. Fill a page with just gill studies.
Don’t stress about symmetry: Real animals aren’t perfectly symmetrical. Small differences make drawings look more natural.
Advanced Techniques
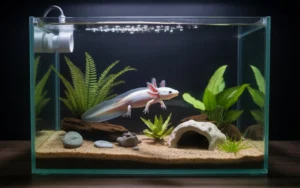
Adding Environment
Draw your axolotl with plants. Java fern and anubias are common in axolotl tanks. Add flowing leaves and stems.
Include rocks or substrate at the bottom. Simple circles or ovals work for pebbles.
Bubbles rising from the gills add movement and context.
Creating Different Ages
Baby axolotls (larvae): Huge eyes relative to body size, shorter gills, very tiny legs.
Juvenile: More proportional but still round and chubby.
Adult: Fully developed gills, longer body, well-defined features.
Showing Emotion
Change the eye shape. Wide eyes look surprised or happy. Half-closed eyes look sleepy or content.
The mouth angle matters. A more dramatic curve shows extreme happiness.
Body language helps too. A curled tail suggests comfort. An extended body suggests alertness.
Using Digital Tools
Many people ask me about drawing axolotls on tablets. The process is similar:
Start with a rough sketch layer. Keep it light and messy.
Create a new layer for clean lines. This lets you delete the sketch underneath.
Use separate layers for colors, shadows, and highlights. This gives you flexibility.
Pressure sensitivity helps with line variation. Press harder for thick lines, lighter for thin ones.
Popular apps include Procreate, Adobe Fresco, and Krita (free).
Teaching Kids to Draw Axolotls
I’ve taught dozens of children, and they love these creatures. Simplify the process:
- Draw a big oval (body)
- Add a circle on one end (head)
- Make two dots (eyes)
- Draw a smile
- Add three squiggly lines on each side (gills)
- Give it four little legs with fingers
That’s it. Kids don’t need perfect anatomy. They need fun and success.
Encourage them to add their own creative touches. Purple axolotls with star-shaped spots? Absolutely! Art should be joyful.
Creating Different Art Styles
Cartoon style: Exaggerate the cute features. Make the eyes huge, the body extra round, the smile wider.
Realistic style: Study anatomy carefully. Add muscle definition, accurate gill structure, proper proportions.
Chibi style: Shrink the body, make the head enormous, simplify everything.
Minimalist style: Use the fewest lines possible while keeping it recognizable.
I switch between styles depending on my mood. Each has value.
Troubleshooting Specific Problems
Problem: Can’t get the proportions right
Solution: Use a grid method. Draw a grid over your reference photo and a matching grid on your paper. Copy one square at a time.
Problem: The gills look messy
Solution: Draw the main stalk first. Then add branches one at a time. Work from the base outward.
Problem: Running out of space on the paper
Solution: Sketch a light box around where you want the final drawing. This helps you plan size.
Problem: Everything looks too stiff
Solution: Draw loose warm-up sketches first. Don’t worry about them being good – just loosen up your hand.
Adding Personality to Your Drawings
Give your axolotl a name and backstory. This sounds silly, but it helps you connect with the drawing.
Add accessories if you want. A tiny hat? A small plant? Go for it. Your drawing, your rules.
Consider expression. Is this axolotl happy? Curious? Sleepy? Grumpy? Let that show.
Preserving and Sharing Your Work
Take clear photos in good lighting. Natural daylight near a window works best.
Consider scanning your drawings. This creates a digital backup.
Share online if you’re comfortable. Instagram and Reddit have active art communities.
Start a sketchbook specifically for axolotls. Looking back through it shows your progress.
Why Drawing Axolotls Matters
These animals are critically endangered in the wild. Every drawing raises awareness.
Art helps people connect with nature. Someone might see your drawing and want to learn more about conservation.
Drawing improves observation skills. You notice details you’d otherwise miss.
It’s relaxing and therapeutic. I’ve sketched axolotls during stressful times for years.
Taking Your Skills Further
Try drawing other salamanders to understand the family better.
Study underwater environments and how light works in water.
Draw from life if you can visit an aquarium with axolotls.
Take an online class focused on animal anatomy.
Experiment with different mediums – watercolor, digital, ink.
Final Thoughts
Drawing axolotls has brought me so much joy. These gentle creatures with their permanent smiles remind us not to take things too seriously.
Your first drawing might not look exactly how you imagined. That’s perfectly fine. Every artist started with wobbly lines and weird proportions.
Keep practicing. Be patient with yourself. Celebrate small improvements.
Most importantly, have fun. Art isn’t about perfection – it’s about expression and growth.
Grab your pencil and give it a try. Draw that adorable face, those frilly gills, that chubby body. You might surprise yourself with what you create.
Remember, the best axolotl drawing is the one you actually finish. Start today, and before you know it, you’ll have a whole collection of these wonderful water creatures swimming across your pages.
Happy drawing!
Administrator
Abdul Wasay is the founder and lead author of Axolotl Portal, a trusted site for axolotl care. He spent almost nine months learning about axolotls, including their tanks, feeding, water care, and common health problems. His knowledge comes from trusted vets, research, and real experience from long term axolotl owners. All Posts by
Related Guides
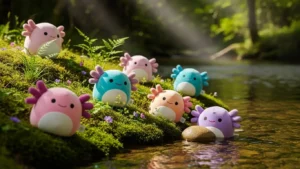
Axolotl Squishmallow Names: The Complete Guide
Abdul Wasay Khatri
How Long Do Axolotls Live? The Truth About Axolotl Lifespan From 7 Years of Experience
Abdul Wasay Khatri

Are Axolotls Endangered? The Shocking Truth (2026 Update)
Abdul Wasay Khatri
Are Axolotls Good Pets?
Abdul Wasay Khatri
Can Axolotls Close Their Eyes? The Answer Will Surprise You (2026)
Abdul Wasay Khatri
Buy Best Axolotl Squishmallow: Your Ultimate Guide to Finding the Perfect Cuddly Companion
Abdul Wasay Khatri

Where Do Axolotls Come From?
Abdul Wasay Khatri
The Complete Axolotl Tank Setup Guide: Everything Your Water Dragon Needs
Abdul Wasay Khatri
Can Axolotls Survive Outside Water? The Critical Facts You Need to Know
Abdul Wasay Khatri
Axolotl vs Salamander: What’s the Real Difference?
Abdul Wasay Khatri