How to Care for Axolotl Eggs: A Complete Hatching Guide
Losing half your egg clutch to fungus taught me hard lessons about proper egg care. During five years breeding axolotls, I’ve refined techniques that consistently hatch 70-80% of fertile eggs into healthy larvae. Success comes down to water quality, temperature control, and vigilant monitoring.
Immediate Steps After Spawning
Remove adult axolotls from the breeding tank within hours of egg laying completion. Parents will eat their own eggs without hesitation. I’ve watched females consume dozens of freshly laid eggs before I could transfer them out.
Identify fertile versus infertile eggs within 24 hours. Fertile eggs appear tan, brown, or amber colored with visible dark centers. Infertile eggs stay white or clear and quickly develop fuzzy fungus. Remove infertile eggs immediately using tweezers or a turkey baster fungus spreads rapidly to healthy eggs.
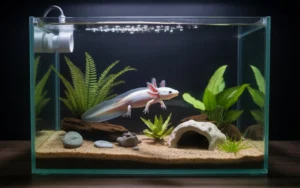
Transfer fertile eggs to a dedicated hatching container. I use 10 gallon tanks with gentle sponge filters that won’t create strong currents. Eggs attached to plants or decorations can be moved with the object or carefully picked off with soft tweezers.
Setting Up the Hatching Tank
Water parameters matter tremendously for egg survival. Maintain these conditions strictly:
- Temperature: 64-68°F (warmer hatches faster, cooler takes longer)
- pH: 7.0-7.6 (stable, not fluctuating)
- Ammonia: 0 ppm always
- Nitrite: 0 ppm always
- Nitrate: Below 10 ppm
Use a lid or cover to reduce evaporation and prevent contamination. Keep the tank in a quiet location away from direct sunlight. Bright light encourages algae growth that competes for oxygen.
Add gentle aeration with an airstone on low setting. Eggs need dissolved oxygen but strong bubbles can damage the delicate jelly coating. Position the airstone away from egg clusters.
Preventing Fungal Infections
Fungus kills more eggs than any other problem. White, cotton-like growth spreads between eggs within hours, destroying entire clutches overnight. Prevention beats treatment every time.
Methylene Blue Treatment: Add 1-2 drops per gallon of water immediately after transferring eggs. This blue dye prevents fungal and bacterial growth without harming developing embryos. Water looks bright blue but clears as eggs absorb it.
Indian Almond Leaves: Natural tannins released from these leaves provide antifungal properties. Add 1-2 leaves per 10 gallons. Water turns light brown, which is normal and beneficial.
Daily Inspection: Check eggs every morning and evening. Remove any white, fuzzy, or dead eggs instantly. I use soft tweezers or a plastic pipette to pluck out problem eggs without disturbing healthy ones.
During my second breeding attempt, I lost 140 eggs to fungus in three days by skipping methylene blue. Now I never hatch eggs without it my survival rates jumped from 45% to 75%.
Water Change Schedule
Perform 20% water changes daily during egg development. Use aged, dechlorinated water matched to tank temperature within 2 degrees. Temperature shocks kill embryos even at advanced development stages.
Carefully siphon debris and dead matter from the bottom without disturbing egg clusters. Rotting material creates ammonia spikes that damage eggs. I use narrow airline tubing for precise cleaning around eggs.
Add fresh methylene blue after each water change it gets diluted and loses effectiveness. Maintain that light blue tint throughout the entire incubation period.

Monitoring Egg Development
Egg development progresses through visible stages over 14-21 days depending on temperature. Here’s what to expect:
Days 1-3: Eggs remain round with dark centers. Cell division happens internally but isn’t visible yet.
Days 4-7: Dark centers enlarge and take shape. You can see the beginnings of the embryo curving inside the jelly coating.
Days 8-12: Tiny eyes appear as black dots. The embryo’s body becomes clearly defined with visible head and tail sections. Movement starts around day 10-11.
Days 13-16: Larvae become very active inside eggs, twitching and wiggling frequently. External gills develop as small feathery structures.
Days 17-21: Hatching begins. Larvae break through the jelly coating and become free-swimming. They still carry yolk sacs attached to their bellies.
I photograph eggs every 3-4 days to track development progress and compare between clutches. This helps identify problems early when interventions can still help.
Optimal Temperature Management
Water temperature directly controls hatching speed. Warmer water (68-72°F) hatches eggs in 12-15 days but stresses embryos. Cooler water (60-64°F) takes 21-24 days but produces stronger larvae.
I maintain 64-66°F as the sweet spot eggs hatch in 16-18 days with excellent survival rates. Use an aquarium heater or chiller to keep temperature rock-steady. Daily fluctuations above 3 degrees harm developing embryos.
Place a reliable thermometer at egg level, not just floating at the surface. Temperature varies at different tank depths, especially in taller containers.
Handling Hatching Day
Larvae hatch over 2-4 days, not all at once. Early hatchers swim actively while late eggs still show embryos moving inside. This staggered timing is completely normal.
Leave newly hatched larvae alone for 48 hours. They survive on yolk sacs and don’t need food yet. Resist the urge to feed immediately their digestive systems aren’t ready.
Keep lighting very dim during hatching. Bright lights stress larvae and encourage algae blooms that deplete oxygen. I cover three sides of the hatching tank with dark paper to create a calm environment.
Remove empty egg casings as larvae hatch. The jelly coatings decompose quickly and create water quality issues. Use a fine mesh net to scoop them out gently.
Common Egg Problems and Solutions
White, Cloudy Eggs: Infertile or dead remove immediately. If many eggs turn white, check water parameters and male fertility in future spawns.
Eggs Covered in Debris: Gently roll eggs with soft tweezers to dislodge particles. Debris blocks oxygen exchange and promotes fungus growth.
Slow Development: Temperature too cold or poor genetics. Gradually raise temperature 1-2 degrees if development stalls past 21 days.
Sudden Die-Off: Usually ammonia spike or temperature shock. Test water immediately and perform 50% emergency water change with precisely matched temperature.
Frequently Asked Questions
Can I keep axolotl eggs in the breeding tank?
Only if you remove the adult axolotls completely. Parents eat eggs on sight. Dedicated hatching tanks provide better control over water quality and make monitoring easier.
How often should I change water for axolotl eggs?
Perform 20% water changes daily throughout the incubation period. Eggs are sensitive to ammonia buildup from decomposing organic matter. Daily changes keep parameters stable.
Do axolotl eggs need light?
No, eggs develop fine in dim lighting. Bright light encourages algae growth that depletes oxygen. Natural room light during daytime provides sufficient illumination for monitoring.
What temperature hatches axolotl eggs fastest?
Water at 68-72°F hatches eggs in 12-15 days, but stresses embryos and reduces survival rates. The safer range of 64-66°F takes 16-18 days with healthier larvae.
Why are my axolotl eggs turning white?
White eggs are either infertile or have died. Remove them immediately before fungus develops and spreads to healthy eggs. Expect 20-40% of eggs to be infertile naturally.
Can you save eggs that develop fungus?
Individual eggs with minor fungus can sometimes be saved by isolation and extra methylene blue treatment. Once fungus spreads heavily, the egg is lost. Prevention through daily removal of dead eggs works best.
Administrator
Abdul Wasay is the founder and lead author of Axolotl Portal, a trusted site for axolotl care. He spent almost nine months learning about axolotls, including their tanks, feeding, water care, and common health problems. His knowledge comes from trusted vets, research, and real experience from long term axolotl owners. All Posts by
Related Guides
Are Blue Axolotls Real? The Truth About Blue Axolotl Colors
Abdul Wasay Khatri
What Should I Do If My Axolotl Jumps Out of the Tank?
Abdul Wasay Khatri
Can Axolotls Eat Each Other?
Abdul Wasay Khatri
How Much Does a Baby Axolotl Cost?
Abdul Wasay Khatri
Where Do Axolotls Live? Complete Habitat Guide (2026 Update)
Abdul Wasay Khatri
What’s The Scientific Name For Axolotl? (Easy Answer For Kids!)
Abdul Wasay Khatri
Do Axolotls Have Bones? Everything You Need To Know (2026)
Abdul Wasay Khatri
99 Amazing Axolotl Facts For Kids: Meet the Coolest Water Pet Ever!
Abdul Wasay Khatri
Do Axolotls Have Superpowers? The Science Behind Their Incredible Abilities
Abdul Wasay Khatri
What Size Tank Does an Axolotl Need?
Abdul Wasay Khatri