Best Axolotl Substrate: Complete Guide to Safe Tank Bottoms
Best Axolotl Substrate is very important for keeping your axolotl safe and healthy. Choosing the wrong substrate can be dangerous. Gravel can cause deadly intestinal blockages if swallowed. Sharp sand can hurt an axolotl’s soft skin. Some materials can even poison the water in the tank.
What is Substrate and Why Does It Matter?
Substrate is the material that covers your tank bottom. Some people call it gravel, sand, or bedding. For axolotls, it’s not just decoration it’s a critical safety decision.
Here’s the problem: Axolotls eat differently than fish. They don’t nibble delicately. They open their mouths wide and create suction, vacuuming up food along with anything nearby including substrate.
If that substrate is gravel, small rocks, or anything bigger than fine sand, your axolotl swallows it. The substrate gets stuck in their digestive system. They can’t pass it. Within days or weeks, they die from intestinal blockage.
This happens to dozens of axolotls every month. Owners post desperate questions online: “My axolotl is bloated and won’t eat.” The diagnosis is almost always impaction from gravel.
The right substrate prevents this.
Safe Substrate Options for Axolotls
Only three options are truly safe:
1. Fine Sand (Best Overall Choice)
What it is: Aquarium sand with grain size 0.5-1.5mm (smaller than a pinhead).
Why it’s safe: If swallowed, fine sand passes through the digestive system harmlessly. It’s too fine to cause blockages.
Pros:
- Natural appearance
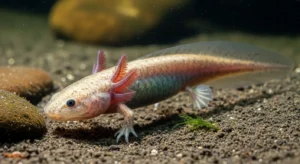
- Axolotls love digging in it
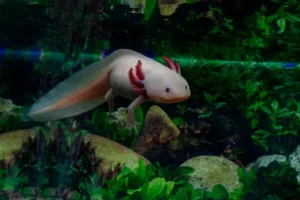
- Mimics their natural muddy lake bottom
- Beneficial bacteria colonize sand, helping with filtration
- Comfortable for axolotls to rest on
Cons:
- Requires initial rinsing (can be time-consuming)
- Can trap waste if not cleaned properly
- Lighter colors show waste more visibly
Best brands:
- CaribSea Super Naturals Crystal River (fine grain, natural color)
- Flourite Black Sand (excellent for planted tanks)
- Play sand from hardware stores (cheapest option, needs thorough rinsing)
How much you need: 1-2 inches depth. For a 20-gallon tank, that’s about 20-40 pounds of sand.
Cost: $10-30 depending on brand and quantity.
2. Bare Bottom Tank (Safest Option)
What it is: No substrate at all. Just glass or acrylic tank bottom.
Why it’s safe: Zero risk of ingestion. Nothing to swallow means no impaction risk.
Pros:
- Easiest to clean (waste visible immediately)
- No risk of impaction
- Cheapest option (free)
- Best for quarantine tanks or sick axolotls
- Easier to monitor axolotl waste and health
Cons:
- Looks sterile and unnatural
- Axolotls can’t dig or burrow
- No surface area for beneficial bacteria
- Axolotls may slip on smooth glass (less grip)
- Some axolotls seem less comfortable without substrate
When to use bare bottom:
- Baby axolotls under 4 inches
- Sick or recovering axolotls
- Quarantine tanks
- If you’re unsure about safe substrate
Cost: $0 (nothing to buy)
3. Large Smooth River Rocks (Partial Coverage Option)
What it is: Rocks larger than the axolotl’s head, smooth and rounded.
Why it’s safe: Too large to swallow. Axolotls can’t fit them in their mouths.
Pros:
- Decorative and natural-looking
- Can’t be swallowed
- Easy to remove and clean
- Good weight for holding down plants or decorations
Cons:
- Doesn’t cover the entire tank bottom
- Waste collects between rocks
- Harder to clean thoroughly
- Doesn’t provide digging substrate
- Expensive to cover large areas
Size requirement: Each rock must be larger than your axolotl’s head. For adult axolotls, that means rocks 3+ inches in diameter.
When to use: As decorative accents in a bare bottom or sand tank, not as primary substrate.
Cost: $15-40 for enough rocks to partially cover a 20-gallon tank.
Dangerous Substrates That Kill Axolotls
These are commonly sold for aquariums but are deadly for axolotls:
Gravel (The #1 Killer)
Grain size: 3-10mm (pea-sized or larger)
Why it’s deadly: Perfect size for swallowing but too large to pass through the digestive tract. Causes impaction and death.
Common brands to avoid: Standard aquarium gravel, colored gravel, natural river gravel.
Even one piece can kill. Don’t risk it.
Small Pebbles
Grain size: 10-20mm (marble-sized)
Why it’s deadly: Axolotls can still swallow these, especially during feeding. Same impaction risk as gravel.
Crushed Coral or Shell
Why it’s deadly: Sharp edges cut the digestive tract. Also raises pH too high for axolotls (they need neutral pH, not alkaline).
Glass Beads or Marbles
Why it’s deadly: Smooth but swallowable. Heavy enough to cause impaction. Too hard to pass through.
Colored or Painted Gravel
Why it’s deadly: Swallowing risk plus toxic paint or dye leaching into water.
Aquarium Soil or Planting Substrate
Why it’s problematic: Most are fine-grained enough to pass if swallowed, but many contain fertilizers or additives that harm axolotls. Some become muddy and cloud water.
Exception: Fluorite Black Sand is an aquarium soil that’s safe IF the grain size is fine enough (under 2mm).
Best Substrate for Baby Axolotls
Recommendation: Bare bottom tank until 4-5 inches long
Baby axolotls (under 4 inches) are especially vulnerable to impaction. Their digestive systems are tiny. Even fine sand can cause problems if they eat too much while learning to hunt food.
Why bare bottom works best:
- You can see exactly how much they’re eating
- Waste is immediately visible (monitor health easily)
- Zero impaction risk during vulnerable growth stage
- Easier to keep water pristine (babies are messy eaters)
When to add substrate: Once your axolotl reaches 4-5 inches and is consistently eating without issues, you can gradually introduce fine sand if desired.
Transition method:
- Start with bare bottom
- Add a thin layer (1/4 inch) of fine sand in one corner
- Monitor for two weeks
- If no issues, slowly add more sand until you reach 1-2 inches depth
Best Substrate for Juvenile and Adult Axolotls
Recommendation: Fine sand (1-2 inches depth)
Once your axolotl is over 5 inches long, fine sand becomes the best choice. At this size:
- Their digestive system can handle small amounts of fine sand
- They have better aim when eating (less accidental substrate intake)
- They benefit from digging and natural behaviors
- The tank looks more natural and appealing
Depth matters: 1-2 inches is perfect. Deeper than 2 inches makes cleaning difficult and creates anaerobic pockets (toxic gas buildup).
Alternative for adults: Bare bottom still works great if you prefer the easiest cleaning routine.
How to Choose the Right Sand
Not all sand is safe. Here’s how to identify good axolotl sand:
Grain Size Test
Pinch test: Take a small amount between your fingers. It should feel smooth, almost silky. If it feels gritty or rough, it’s too coarse.
Visual test: Individual grains should be smaller than a pinhead. If you can easily see individual grain shapes, it might be too large.
Scientific measurement: 0.5-1.5mm grain size is ideal. Most product descriptions list this.
Color Considerations
Natural tan/beige: Shows waste easily, looks natural, doesn’t alter water chemistry.
White or light sand: Shows every speck of waste (high maintenance but ensures you never miss cleaning).
Black sand: Hides waste well (too well you might miss problems), looks sleek and modern, some axolotls show better color contrast against dark substrate.
Colored sand: Generally avoid unless specifically labeled aquarium-safe and non-toxic. Many colored sands use dyes that leach into water.
Material Composition
Silica sand: Most common. Inert (doesn’t change water chemistry). Safe.
Aragonite sand: Raises pH and hardness. NOT safe for axolotls (they need neutral pH).
Play sand: Very fine silica sand from hardware stores. Cheap but requires extensive rinsing. Safe once clean.
Pool filter sand: Another cheap option. Slightly coarser than play sand but still safe if grain size is under 1.5mm.
How to Prepare Sand Before Adding to Tank
Raw sand contains dust, debris, and manufacturing residue. Never add it directly to your tank.
Rinsing Process
Supplies needed:
- Large bucket (5 gallon)
- Garden hose or sink with strong water pressure
- Patience (this takes 30-60 minutes)
Steps:
- Pour sand into bucket (fill only 1/3 full)
- Add water until bucket is 2/3 full
- Stir vigorously with your hand or large spoon
- Let sand settle for 10 seconds
- Pour off cloudy water (sand stays at bottom)
- Repeat steps 2-5 until water runs almost clear (10-20 times minimum)
- Do final rinse in smaller batches for clarity
- Sand is ready when water is mostly clear with minimal cloudiness
Time-saving tip: Work in multiple buckets simultaneously. While one settles, you’re rinsing another.
For play sand: Expect to rinse 20-30 times. It’s dirty.
For aquarium sand: Usually only needs 5-10 rinses.
Adding Sand to Your Axolotl Tank
Method 1: Empty Tank (Easiest)
- Rinse sand thoroughly
- Pour rinsed sand directly into empty tank
- Spread evenly to 1-2 inch depth
- Add decorations
- Slowly pour water over a plate or bowl to avoid disturbing sand
- Start filter once water is added
- Let tank cycle before adding axolotl
Method 2: Established Tank (With Axolotl Present)
- Rinse sand extremely well
- Place rinsed sand in large plastic bag
- Submerge bag in tank
- Cut open bag underwater
- Gently spread sand across bottom while still underwater
- Remove bag carefully
- Expect cloudiness for 6-24 hours (normal)
Important: Method 2 causes temporary cloudiness and can stress axolotls. If possible, move your axolotl to a temporary container during the process.
Substrate Maintenance and Cleaning
Weekly Maintenance
Use a gravel vacuum during water changes — Even though it’s called a gravel vacuum, it works perfectly for sand. Hover the siphon 1-2 inches above the sand. It sucks up waste while leaving most sand in place.
Stir the sand gently — Once per week, use your hand or a long stick to gently stir the top inch of sand. This prevents compaction and releases trapped gases.
Remove visible waste immediately — Turkey baster or pipette works great for spot-cleaning between water changes.
Monthly Deep Clean
Smooth out valleys and hills — Axolotls and filter flow create uneven sand depth over time. Redistribute for even coverage.
Check for anaerobic pockets — Smell the sand when you stir it. If it smells like rotten eggs (sulfur), that’s toxic hydrogen sulfide gas. Stir more frequently or reduce sand depth.
Remove and rinse if needed — If sand looks dirty even after vacuuming, remove portions, rinse thoroughly, and return to tank.
Signs You Need to Clean More Often
- Cloudiness that doesn’t clear within 24 hours
- Visible waste accumulation on sand surface
- Sulfur smell when stirring sand
- Axolotl refusing to rest on substrate
- Algae growth on sand surface
Common Substrate Questions Answered
Can I mix sand with gravel?
No. Absolutely not. Mixing creates the worst of both worlds. Your axolotl will still eat gravel pieces, and they’ll get impacted. The sand doesn’t make gravel safer.
What if my axolotl eats sand?
Small amounts of fine sand pass through harmlessly. It’s natural and expected. You’ll see sand in their waste. This is normal and not dangerous.
Problem signs:
- Bloated belly that stays swollen
- Refusing food for more than 3 days
- Floating uncontrollably
- Visible distress or lethargy
If you see these signs, consult a vet immediately.
Can I use colored sand?
Only if it’s specifically labeled aquarium-safe and non-toxic. Many colored sands use dyes that leach into water. When in doubt, stick with natural colors.
Do I need substrate at all?
No. Bare bottom tanks work perfectly fine. Substrate is for the axolotl’s enrichment and your aesthetic preference, not a biological necessity.
What about sand for planted tanks?
Fine aquarium soils like Fluorite Black Sand work well and support live plants. Verify grain size is under 2mm and contains no fertilizers or additives harmful to axolotls.
How deep should the sand be?
1-2 inches is ideal. Less than 1 inch and it spreads too thin. More than 2 inches creates cleaning problems and gas buildup.
Can baby axolotls have sand?
Not recommended until they’re 4-5 inches long. Stick with bare bottom for babies.
Will sand scratch my tank glass?
No, as long as you don’t grind it against the glass while cleaning. Be gentle with siphons and scrapers near the substrate line.
What if sand gets in my filter?
A little sand in the filter is normal and harmless. It settles in the bottom of canister filters or gets trapped in sponge filters. Clean it out during regular filter maintenance.
Can I reuse sand from an old tank?
Yes, but rinse it thoroughly first, especially if the old tank had different fish or disease issues. Treat it like new sand rinse until water runs clear.
Substrate Ideas for Specific Tank Setups
Naturalistic/Biotope Tank
Goal: Mimic Lake Xochimilco environment
Substrate: Fine tan or brown sand, 1-2 inches deep
Additions:
- Smooth river rocks (large) for visual interest
- Clay pots for hides (buried partially in sand)
- Live plants (Anubias, Java fern) attached to rocks
- Driftwood pieces for cover
Aesthetic: Natural, earthy, educational
Minimalist/Easy Maintenance Tank
Goal: Simplest possible cleaning routine
Substrate: Bare bottom
Additions:
- Large smooth stones as decoration only
- PVC pipe hides (easy to lift and clean)
- Silk plants in pots (remove for cleaning)
- Dark background to reduce sterile appearance
Aesthetic: Clean, modern, low-maintenance
Planted Display Tank
Goal: Beautiful planted aquascape
Substrate: Fine black aquarium sand or Fluorite sand, 1.5-2 inches
Additions:
- Low-light plants (Anubias, Java fern, moss balls)
- Slate rocks for plant attachment
- Driftwood for texture
- Minimal decorations (plants are the focus)
Aesthetic: Lush, green, Instagram-worthy
Budget-Friendly Tank
Goal: Safe and functional without spending much
Substrate: Bare bottom or play sand (thoroughly rinsed)
Additions:
- Terracotta pots for hides ($2-3 each)
- Smooth rocks from landscaping supply (cheaper than pet stores)
- No decorations needed beyond essentials
Aesthetic: Simple, functional, budget-conscious
Sand vs. Bare Bottom: The Final Verdict
Choose SAND if:
- Your axolotl is 5+ inches long
- You want a natural appearance
- You enjoy watching digging behavior
- You have live plants that need substrate
- You don’t mind extra cleaning effort
Choose BARE BOTTOM if:
- Your axolotl is under 5 inches (baby/juvenile)
- You want the easiest possible maintenance
- Your axolotl is sick or recovering
- You’re a beginner and want zero impaction risk
- You prioritize function over aesthetics
Both are safe. Neither is “better” objectively. Choose based on your priorities and situation.
What to Do If Your Axolotl Has Gravel
If you currently have gravel in your axolotl tank, remove it immediately.
Emergency protocol:
- Set up temporary container with clean, cool, dechlorinated water
- Move axolotl to temporary container
- Remove all gravel from tank
- Clean tank thoroughly
- Choose safe substrate (fine sand or bare bottom)
- Refill tank, let it stabilize
- Return axolotl
Check for impaction symptoms:
- Bloated belly
- Refusing food
- Lethargy
- Floating
If you see these signs, consult an exotic vet immediately. Impaction can be fatal within days if untreated.
Prevention is easier than treatment. Switch to safe substrate now before problems develop.
Best Axolotl Substrate Recommendations
Best Overall: CaribSea Super Naturals Crystal River
- Grain size: 0.5-1mm (perfect)
- Color: Natural tan
- Pre-washed (minimal rinsing needed)
- Cost: ~$25 for 20 lbs
Best Budget: Play Sand (Hardware Store)
- Grain size: 0.5-1.5mm
- Color: Natural tan/beige
- Requires extensive rinsing
- Cost: ~$5 for 50 lbs
Best for Black Sand Lovers: Flourite Black Sand
- Grain size: 1-2mm
- Color: Deep black
- Great for planted tanks
- Cost: ~$30 for 15 lbs
Best for Beginners: Bare Bottom
- Grain size: N/A
- Color: Glass (add background for color)
- Zero preparation needed
- Cost: $0
Final Thoughts
Your substrate choice directly impacts your axolotl’s safety and health. Gravel kills. Fine sand or bare bottom keeps them alive.
The decision is simple:
For baby axolotls (under 5 inches): Bare bottom tank, no exceptions.
For adult axolotls (5+ inches): Fine sand (1-2 inches) or bare bottom, your choice.
Never use: Gravel, pebbles, crushed coral, glass beads, or anything larger than 2mm.
Thousands of axolotls die every year from impaction caused by wrong substrate. Don’t let yours be one of them. Choose safe substrate from day one, and your axolotl will thrive for 10-15 years or more.
When in doubt, go bare bottom. You can always add sand later. But you can’t undo impaction once it happens.
Make the safe choice. Your axolotl’s life depends on it.
Administrator
Abdul Wasay is the founder and lead author of Axolotl Portal, a trusted site for axolotl care. He spent almost nine months learning about axolotls, including their tanks, feeding, water care, and common health problems. His knowledge comes from trusted vets, research, and real experience from long term axolotl owners. All Posts by